My home had this unused space in the kitchen. I decided to make some sort of use out of it and made a desk nook. Now I love the space and use it all the time! And I have lots more storage!
I am a visual person so it helps me to see my final product if I draw it out with dimensions, etc.. This also helps when you're figuring out your materials you need.
This is a Miter Saw. You will need one for this project :).
Other tools/materials you'll need for this project:
-Nail Guns
*16 Gauge-2" nails
*18 Gauge Brad Nailer-5/8", 1", & 1 1/2" nails
-Compressor for nail guns
-Circular saw
-Power sander
-Measuring Tape
-Pencil
-Power Drill
-1/8" drill bit for pre-drilling some holes
-2" Screws
-Hammer
-Jigsaw
-level
-two flat head screw drivers or Crowbar for baseboards
-3 8' 2x4's
-enough 1/2" thick MDF board to cover a 3'x6' area (to cover up the framed in desk)
-enough base board to cover the desk and the wall *I used 9 1/2 feet for my desk and my wall (where you ripped it off)
-a piece of appearance board measuring 19"wide by 32" long for the top of your desk
-your choice color of stain (I used MinWax Wood Finish Dark Walnut)
-white wood board strips 1"x4"x8' (need 1)
-wood putty
-stainable wood putty

-1/2" thick board for drawers and envelope slots (you'll need approximately 8' *I bought 2 2'x4' pieces of board)
-3/4" thick board for the front of the drawers and the drawer holders (you'll need approximately 10' *I bought 1 pine board strip 1"x12"x8' and 1 pine board strip 1"x12"x6')
-2 9" wide, 1' deep, and 30-32" tall upper cabinets (I bought mine from a re-store for a good price...they are too difficult to make. However, they were 40" tall so I had to shorten them and reinforce them at 30").
-5 pull hardware for your drawers
-2 cabinet pull hardware for your cabinets
-22" of your choice of rope moulding (preferably 1" thick)
-86" (7'2") of your choice of rope moulding (preferably 1/2" thick)
-30" of your choice of flat moulding (preferably 1" thick)
-2 corbels of your design choice
-piece of bead board measuring 16" x 34"
-6' of your choice of crown moulding
-enough masonite board to cover 3 pieces measuring 11 1/2" x 29"
Rip off the baseboards in the area you'll be working. I used a hammer and two flat head screw drivers to pry them off the wall.
To start on the desk you need to frame in the legs. I made mine 19" deep and 31 1/2" long. The space here is 32" long but I wanted my desk to be flush with the existing wall. My MDF board I used to cover up the framed in legs to the desks was 1/2" thick. That's where the other 1/2" comes into play. I used my 2" screws and power drill here to drill into the studs and the ground to have a secure connection. I also used my 16 gauge nail gun and 2" nails to secure the pieces that weren't screwed to a stud in the wall. I cut, using my miter saw, 6 2x4's that were 36" long and 4 that were 7 1/4" long. Assemble them as shown in the picture below where you will have your desk.

Using your circular saw; cut 3 pieces from your MDF board measuring 3' tall by 19" wide. Also cut 1 piece measuring 4" wide by 3' tall (this is for the left front side) and 1 piece measuring 4 1/2" wide by 3' tall (this is for the right front side). Using your 18 gauge brad nailer gun and 1 1/2" nails attach your newly cut MDF board to your framed in 2x4's. Cover up your nail holes with wood putty.
Cut your appearance board with your circular saw to measure 19"wide by 32" long for the top of your desk. In this picture I bought the wrong size board and didn't want to drive back to Home Depot to get the correct size. Thinking it would look fine if I just pieced it together, I learned the hard way that it didn't. After I had stained/finished the top I realized how horrible it looked! Don't do what I did. I had to go back to the store and get the correct size, ripped the top piece off, and did it the correct way with the correct size board.
This upper piece to the desk is a "floating" top. It looks like it's a thick piece of wood when it's really just three pieces of wood giving the illusion of a pricey design. Using the miter saw cut your white wood board. Cut 1 piece measuring 32 1/2 inches and the other measuring 19 inches. Make sure to cut a 45 degree angle to match the front right corner up nice and clean. Attach the Appearance board with your 18 gauge brad nailer and the 1 1/2" nails. Make sure to cover the nail holes for the top with stainable wood putty.
Since the desk is flush with the wall It needs something to distinguish where the desk ends and the wall starts. I used rope moulding. Cut your 1" thick rope moulding to the correct length. Mine was 22" long. It just depends on how tall your baseboards are.
Measure and cut your baseboard with your miter saw. Attach the baseboard with your 18 guage brad nailer and 1 1/2" nails. Make sure to cover the nail holes with wood putty. Sand down the areas you put wood putty and the edges to the appearance board for the top of your desk. This makes the edges much smoother and more child proof. I sanded the inside edge of the front piece. My little girl likes to crawl under there and play so this helps if she hits her head down there.
Tape off the edges around the wall. Stain your appearance board. Make sure to stain the under side of the desk. I gave mine a few coats so it would match my
cupboards I recently updated.
Paint the bottom MDF boards and your baseboards white. I gave mine a couple of coats.
When your paint is completely dry tape off just the MDF boards. You'll be glazing the 6 edges of the desk. If you would like to glaze these when you glaze the upper cupboards you can. Either way it doesn't really matter. You'll just want to make sure that you get the same color so they match. Follow my
Glazing 101 tutorial on how to glaze.
And the Desk is finished!
Now for the upper cupboards and drawers
You'll need to cut (I used my circular saw for the longer pieces and my miter saw for the shorter pieces *try to use your miter as much as you can to get a cleaner cut):
*From your 1/2" thick board 2'x4' for drawers and envelope slots
-10 pieces measuring 3"x 9 3/8" (right and left sides to each drawer)
-8 pieces measuring 4"x 11 1/4" (envelope slot sides)
-5 pieces measuring 3"x 5 3/8" (back piece to each drawer)
-5 pieces measuring 4 3/4" x 9 3/8" (bottom piece to each drawer)
*from your 3/4" thick pine board for drawers and drawer holders
-5 pieces measuring 2 7/8" x 5 3/8" (drawer fronts)
-2 pieces measuring 11 1/4" x 32" (the top and bottom pieces that hold your drawers)
-6 pieces measuring 3" x 11 1/4" (the pieces that separate your drawers)
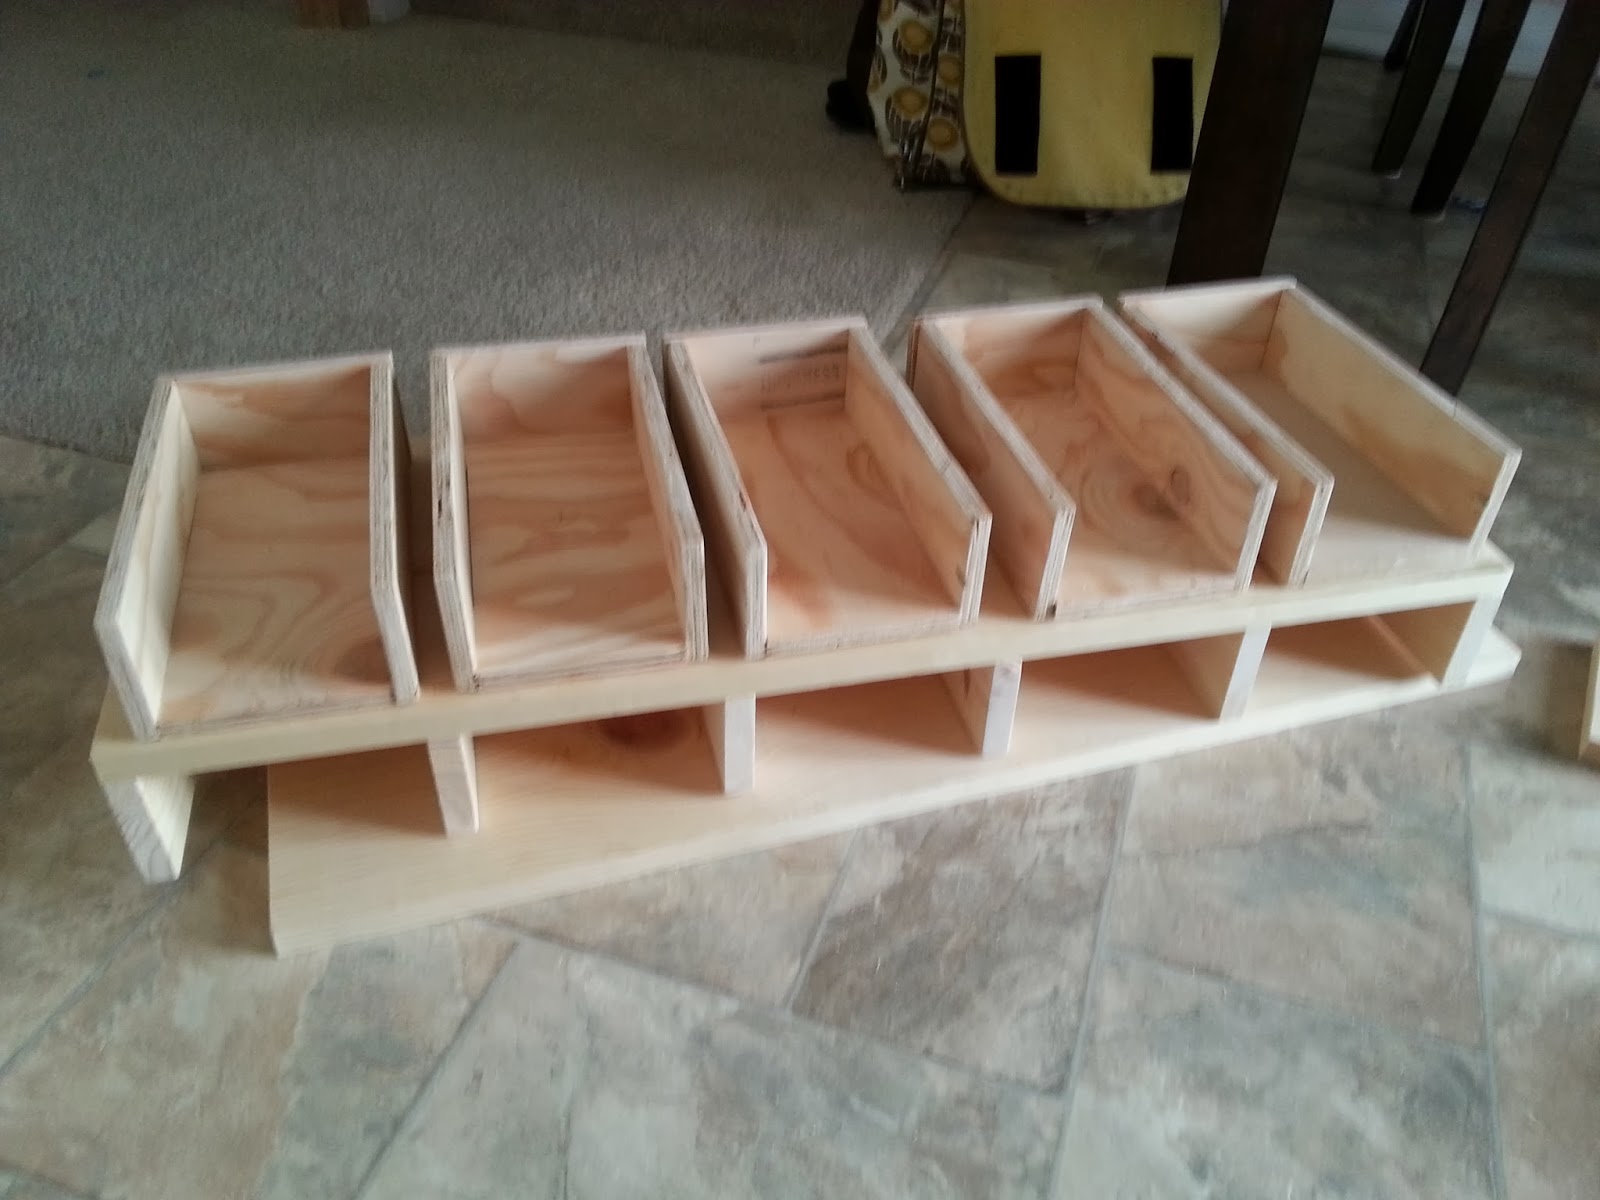
-2 pieces measuring 16" x 8 1/2" (the back pieces to hold the drawers and envelopes slots together as one big piece to attach to the wall) *You will need to use your jigsaw on these two pieces. Cut out of one corner on each piece you just cut a piece of wood measuring 4" x 7". Look at the second picture down. These two pieces are the "L" shaped boards.
Using your Power Sander smooth the edges and corners of each piece of wood. This takes some time so get comfortable :).
In 5 piles place a bottom, back, left, right, and front side to each drawer.
Using your 18 gauge brad nailer and your 1" nails attach the pieces as I have done in the picture below. Nail the right and left sides on the outer edges of the bottom piece. Make sure to line them up. Add the back piece making sure it is lined up as well.
Measure where the middle of each front piece to the drawers is and mark it with a pencil. Using your power drill and 1/8" drill bit drill a hole in each front piece. Pull out your power sander and smooth the outer edges of each hole.
Pull out one of your pine wood boards measuring 11 1/4"x 32" and the 6 pieces measuring 3"x 11 1/4". Place the drawers on top of the 11 1/4" x 32" piece of pine board and mark where to nail the 6 pieces to it.
Using your 18 gauge brad nailer and 1 1/2" nails attach the pieces together.
Pull out your 8 pieces of wood measuring 4" x 11 1/4". Now you'll assemble the envelope slots. Don't pay attention to the picture below quite yet. To attach the envelope slots you'll need to turn your current piece of wood upside down and nail through the existing 6 pieces. The cabinets will eventually sit on top of these envelope slots on the wall so they need to be the same width as the cabinets. My cabinets are 9" wide. So each slot is about 2 2/8" apart. Just make sure to do each outer piece first so you have the correct width you need to match up with the cabinets later on.
Make sure to do both sides of envelope slots.
Now attach the bottom pine wood board piece measuring 11 1/4" x 32" to your project. In this picture below I was testing my drawers to make sure they would fit with some wiggle room.
Pull your drawers out so you can attach the front to them.
Using the 1 1/2" nails, attach the front piece to each drawer.
Cover up all of your nail holes and crevices with wood putty.
Once your wood putty has dried completely get your sander out again and smooth any roughness.
Going back the drawer and envelope slot project we'll add the back to the entire piece so you can attach it to the wall. Pull out the two pieces of wood measuring 8 1/2" x 16" which was cut with the jigsaw. Placing them opposite ends together, like the picture below, nail these two pieces to the envelope slot and drawer holder. Make sure to do the left side first in this picture. This will ensure that this piece is flush to the edge which will be seen. The right side will be secured to the wall when all is said and done so it's O.K. if it's not perfectly flush. That can be fixed with wood putty.
Cover any nail holes or crevices with wood putty. Make sure to sand them down when they are dry.
These are the two cabinets I bought from the restore. I got each for $30.00 which was a great deal!
Mine were white already so I didn't need to paint them. But if yours are not, make sure to paint them white now.
When they are dry you'll
glaze them.
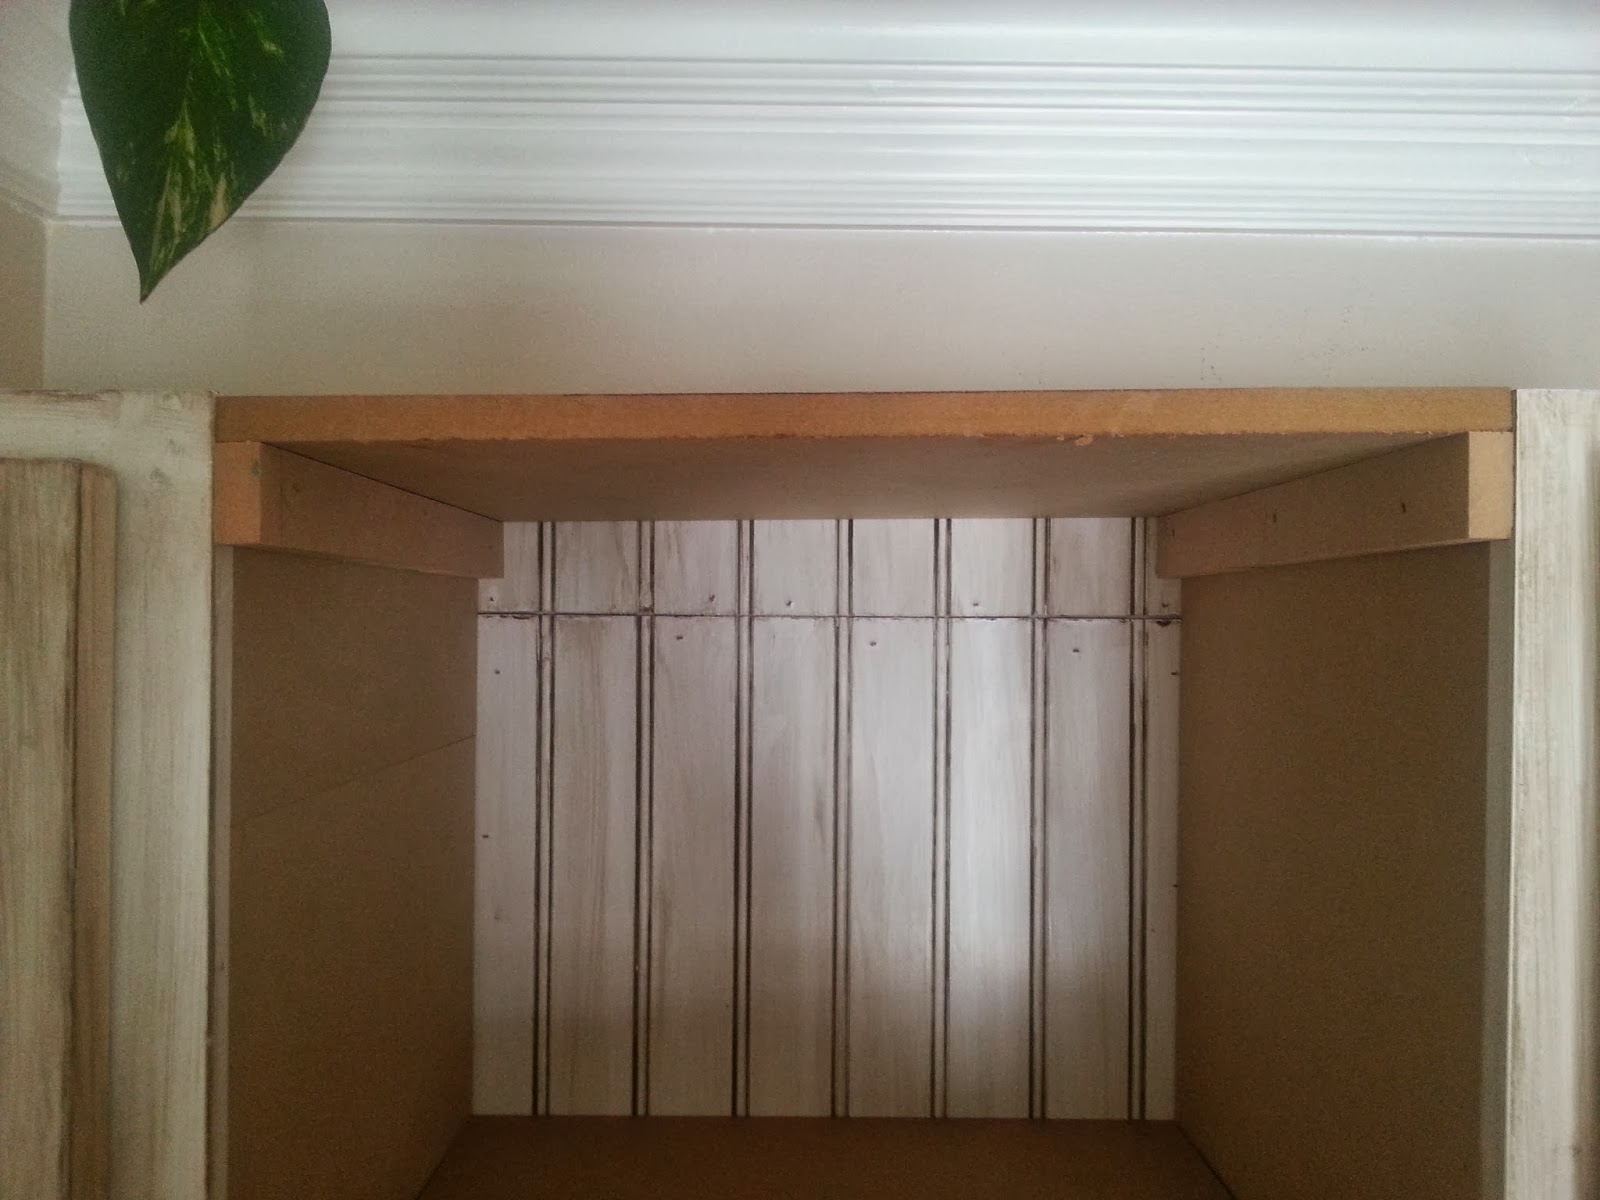
I used my 16 gauge nail gun and 2" nails to this next part. This picture below shows the inside of a drawer slot. My drawers sunk in a little too far when I placed them in each slot. To fix this problem I put two nails in each slot toward the back where they would stop the drawer and make it flush in the front.
Paint your drawers and this piece white. Mine took a couple of coats.
When it is completely dry...you'll
glaze it all. When your glaze is completely dry, add your 5 hardware pulls to the front pieces of each drawer.
Pre-drill the holes for your pull hardware on the doors to your cabinets by using the 1/8" drill bit and power drill. Add the hardware.
Paint your 2 corbels white and glaze them.
Paint and glaze your bead board.
Now lets secure everything to the wall
Using your 18 gauge brad nailer and 5/8" nails attach the bead board to the wall. In the picture below I had to piece some extra pieces of bead board together because I measured incorrectly the first time. Don't worry, if you cut your bead board following my measurements at the beginning of this tutorial you'll be fine. Make sure to measure where you want it on the wall and mark it with a pencil. I put mine 8" from the left side of the wall which made it 8" from the right. From the bottom of the bead board I put it 22" up from the top of the desk. This will give you 19" between the bottom of the drawers and the desk when you have it all assembled and secure to the wall.
Now you need two people to secure the envelope/drawer piece and your two cabinets.
I added the picture below so you could see the distance between the desk and the bottom of the drawers.
Pull out your power drill an 2" screws again. Also get your 1/8" drill bit. Find your studs and pre-drill a few holes between the envelope slots that will match up to your studs.
Drill your 2" screws into the studs. Have one person hold the envelope/drawer piece making sure it is level while the other person screws it to the wall.
While one person is still holding onto the envelope/drawer piece pre-drill some holes into each corbel where they will hit a stud. Drill your two corbels to the wall on the right and left sides of the envelope/drawer piece. Make sure they are flush with the bottom of the envelope/drawer piece so they can help support the weight of it. Using your 16 gauge nail gun and 2" nails secure the top part of each corbel to the bottom of the envelope/drawer piece. Make sure you go straight up into the very edge of this piece! You don't want to have any nails go into the hole for the drawer! Wood putty any holes or crevices and sand them down so you can touch them up at the end.

Now we'll secure both cabinets to the wall above your existing piece. Put one cabinet up at a time. Take the doors off so it's really easy to put them up. While one person holds a cabinet up, have the other person screw the cabinet to the wall. I was told afterwards that I really only needed to put to screws in the top of each cabinet into a stud and that was all it took. So you really don't need to go crazy like i did in the picture :). Make sure that your doors will open the correct way.
Now we'll add the Masonite to the sides of the cabinets.
Using your 18 gauge brad nailler and 5/8" nails attach the Masonite to the cabinets.

I had a gap between my cabinet and the envelope slots. To cover this up and make it look like it was all one piece I added the 1/2" rope moulding. Measure and cut your 5 pieces with 45 degree angle cuts for the corners to match up and look clean. I added this piece of left over MDF board to the gap so i could have something to shoot my 5/8" nails into.
Wood putty the nail holes and sand them down.
Using your left over MDF board cut two shelves to fit between your cabinets. I cut mine 1' x 14 1/4".
Crown Moulding...Yikes!! So this was the first time I ever cut crown moulding and to boot I did it by myself..bad idea! If it's your first time I would have someone else help you to make sure it's level and that it will match up with the other pieces. I followed a tutorial on how to cut crown moulding angels. It was really helpful, I just think it would have come together much easier with another person.

Cut the extra 1/2" rope moulding and 1" strip moulding to fit in front of your shelves. I cut the edges with a 45 degree angle for a cleaner look.
Wood putty the nail holes and sand them down.
I like to add a piece of board at the top of my cabinets so I can add decorations up there.
Make sure all the holes have been covered with wood putty and sanded down. Tape off the areas you need to paint and glaze.
When everything is dry pull the tape off.
And everything is complete!!!
Add a chair, some decorations, some paper in your envelope slots, a calendar, and you're set. I also added some stick on lights under the drawers.